IBM WebSphere MQ 快速入门: 安装, 配置, Java调用
Categories: Java; Tagged with: IBM MQ • Java; @ December 2nd, 2012 0:25非常简单的快速入门: 从Host发送Message到VM.
MQ版本: 7.5
操作系统版本:
主机/Host: Windows 7 64 Home
虚拟机/VM: XP Pro SP3
1. 下载及安装
在IBM.com可直接下载IBM的试用版. (需要登录)
之后的安装非常简单, 不做描述.
2. 配置
配置概要
依次配置: QueueManager, Queue, Channel:
| Name @Host | Name @VM | Remarks | |
| Queue Manager | QM_Host | QM_VM | Keep other options default |
| Queues | Host_TRAN_Q | VM_LOCAL_RECEIVE_Q | Local queue, Usage: Transmission |
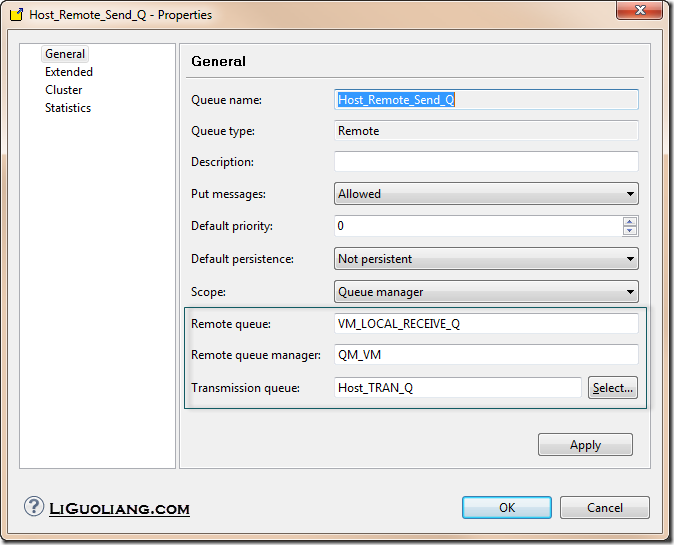
| Host_Remote_Send_Q | VM只接受, 因此不需配置. | Remote queue. need config: 1. Remote queue: (For Host, VM is the remote) 2. Remote queue manager: 3. Transmission queue: Ref to screen capture 1 |
|
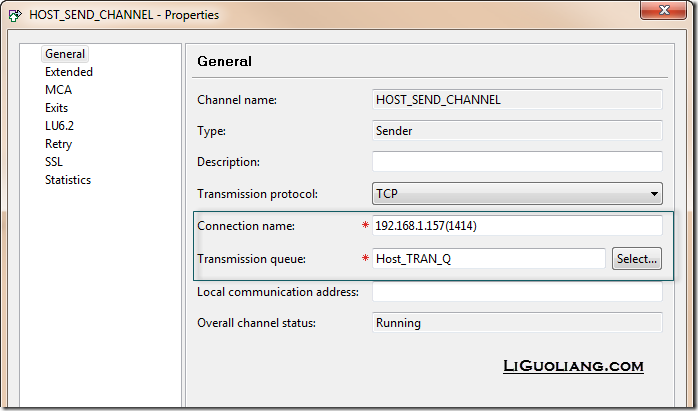
| Channels | HOST_SEND_CHANNEL Ref to screen capture 2 |
HOST_SEND_CHANNEL | [很抱歉, 命名很烂] Host端Type: Sender; VM端: Receiver 保持相同名称. |
| ChannelServerConnTes | ChannelServerConnTes | Type:Server-connection, 配置MCA user或保持默认 为Java端配置 |
(配置Remote queue, Remote queue manager, 对Host来说, VM就是Remote, 因此配置为VM中的队列名称)
(发送队列, Connection Name实际为Remote server的IP(port))
由于配置较多, 因此将Host及VM两侧的Queue及Channel抓图如下:
Host:
VM:
3. 测试
在上述Queue manager, Queue, Channel配置妥当之后, 进行测试:
1. 在Host端, 选中HOST_SEND_CHANNEL (Sender)后, 右键 “ping” 测试:
如果测试失败, 关闭或配置防火墙.
2. 放入消息进行测试:
确定两端HOST_SEND_CHANNEL (Sender)启动后(状态应为Running), 在Host端的Host_Remote_Send_Q (Remote) 右键 Put message.
在VM端, 队列中可以看到收到Message:
至此, MQ已经配置完毕并通过测试.
4. 使用Java调用
前置条件: 创建type为Server-connection的Channel. 本例中的ChannelServerConnTes, 该Channel无法开启, 创建完毕后供Java端使用.
先拿来用:
http://java-brew.blogspot.sg/2011/01/java-code-to-connect-to-mq.html 或:
http://blog.csdn.net/fenglibing/article/details/4161441
5. 常见错误及解决
1. Channel ping不通
检查防火墙.
2. MQJE001: Completion Code ‘2’, Reason ‘2035’.
如果供Java端使用的Server-connection.MCA中不填入正确的UserID (mqm用户组中的用户), 会导致如下之错误信息:
MQJE001: Completion Code ‘2’, Reason ‘2035’.
解决方法有:
(需要保证该用户在操作系统mqm用户组中)
2. 禁用Channel认证:
运行: IBM\WebSphere MQ\bin\runmqsc.exe:
alter qmqr chlauth(disabled)
由于我的Win7 Home无法管理用户组, 所以直接用第二种方法disable掉channel 认证.
ref: http://space.itpub.net/14789789/viewspace-374497 or http://blog.csdn.net/javalover_yao/article/details/6387460
3. MQJE001: Completion Code ‘2’, Reason ‘2539’
错误信息:
CC=2;RC=2539;AMQ9204: Connection to host ‘192.168.1.220(1414)’ rejected. [1=com.ibm.mq.jmqi.JmqiException[CC=2;RC=2539;AMQ9547: Type of remote channel not suitable for action requested. [3=HOST_SEND_CHANNEL]],3=192.168.1.220(1414),5=RemoteConnection.analyseErrorSegment]
使用了错误的Channel, 供Java使用的Channel type应为: Server-connection.
4. Java中 new MQQueueManager时耗时很久, 最后抛出异常:
com.ibm.mq.MQException: MQJE001: Completion Code ‘2’, Reason ‘2009’.
Caused by: com.ibm.mq.jmqi.JmqiException: CC=2;RC=2009;AMQ9204: Connection to host ‘192.168.1.220(1414)’ rejected. [1=com.ibm.mq.jmqi.JmqiException[CC=2;RC=2009;AMQ9208: Error on receive from host ‘/192.168.1.220:1414 (Guoliang-PC)’. [1=-1,2=ffffffff,3=/192.168.1.220:1414 (Guoliang-PC),4=TCP]],3=192.168.1.220(1414),5=RemoteConnection.receiveTSH]
检查MQEnvironment是否设置了编码CCSID. 如:MQEnvironment.CCSID=1381;
6. 参考资料:
IBM WebSphere MQ的簡介與實作:
百度文档:
MQ 服务器配置与测试一例 http://wenku.baidu.com/view/a6e30117866fb84ae45c8d92.html
MQ安装和配置 http://wenku.baidu.com/view/d0f1a16a561252d380eb6e1d.html
(完)
Java Mail SMTP发送邮件实例 Sending Email with SMTP using Java Mail
Categories: Java; Tagged with: Java • Java Mail • Java邮件 • SMTP; @ September 13th, 2012 18:09The JavaMail API provides a platform-independent and protocol-independent framework to build mail and messaging applications. The JavaMail API is available as an optional package for use with Java SE platform and is also included in the Java EE platform.
Download JavaMailAPI: http://www.oracle.com/technetwork/java/javamail/index.html
import java.util.Properties;

import javax.mail.Message;
import javax.mail.MessagingException;
import javax.mail.PasswordAuthentication;
import javax.mail.Session;
import javax.mail.Transport;
import javax.mail.internet.AddressException;
import javax.mail.internet.InternetAddress;
import javax.mail.internet.MimeMessage;


public class JavaMailTest {

	public static void main(String[] args) throws AddressException, MessagingException {
			String host = "smtp server addr.";
		    final String from = "[email protected]";
		    final String password = "password";
		    String to = "abc@_example.com";

		    // Get system properties
		    Properties props = System.getProperties();
		    // Setup mail server
		    props.setProperty("mail.smtp.host", host);
		    props.setProperty("mail.smtp.auth", "true");
		    props.setProperty("mail.smtp.port", "25");

		    // Get session
		    Session session = Session.getInstance(props,
		  		  new javax.mail.Authenticator() {
				protected PasswordAuthentication getPasswordAuthentication() {
					return new PasswordAuthentication(from, password);
				}
			  });

		    // Prepare message
		    MimeMessage message = new MimeMessage(session);
		    message.setFrom(new InternetAddress(from));
		    message.addRecipient(Message.RecipientType.TO, new InternetAddress(to));
		    message.setSubject("Hello JavaMail");
		    message.setText("Test Email from JavaMail");

		    // Send message
		    Transport.send(message);
	}

}
JRE/JDE related ANT build Errors
Categories: Java; Tagged with: ANT • Java • JDK; @ July 30th, 2012 18:35I’m trying to build some java project in my new pc, got some error:
build.xml:46: Unable to find a javac compiler;
com.sun.tools.javac.Main is not on the classpath.
Perhaps JAVA_HOME does not point to the JDK.
It is currently set to “C:\Program Files (x86)\Java\jre7”
or :
cannot access java.util.ArrayList
[javac] bad class file: C:\Program Files (x86)\Java\jre7\lib\rt.jar(java/util/ArrayList.class)
[javac] class file has wrong version 51.0, should be 49.0
[javac] Please remove or make sure it appears in the correct subdirectory of the classpath.
[javac] import java.util.ArrayList;
[javac] ^
[javac] 1 error
[javac] 100 warnings
I have config the Path environment variable, and the JRE installed in Eclipse preferences, I got those Errors also, and I forget there also need to config the ant run configuration: run as… and switch to ‘JRE’ tab, select the right JDK.
Parse EXCEL usint Apache POI-HSSF and POI-XSSF
Categories: Java; Tagged with: Apache • Apache POI • Excel • Java; @ July 27th, 2012 8:24HSSF is the POI Project’s pure Java implementation of the Excel ’97(-2007) file format. XSSF is the POI Project’s pure Java implementation of the Excel 2007 OOXML (.xlsx) file format. HSSF and XSSF provides ways to read spreadsheets create, modify, read and write XLS spreadsheets.
package com.test;

import java.io.FileInputStream;
import java.io.FileNotFoundException;
import java.io.IOException;

import org.apache.poi.ss.usermodel.Cell;
import org.apache.poi.ss.usermodel.Row;
import org.apache.poi.ss.usermodel.Sheet;
import org.apache.poi.ss.usermodel.Workbook;
import org.apache.poi.xssf.usermodel.XSSFWorkbook;

public class HSSFTest {
	public static void main(String[] args) {
		String xlsName = "D:/justForTest.xlsx";
		FileInputStream fis;
		try {
			fis = new FileInputStream(xlsName);
			Workbook workbook = new XSSFWorkbook(fis);

			// Get the first sheet;
			Sheet sheet = workbook.getSheetAt(0);

			// for each row
			for(Row row : sheet) {
				Cell cell = row.getCell(0); // get the cell
				// print cell contents.
				System.out.println(cell.getStringCellValue());
			}

		} catch (FileNotFoundException e) {
			// TODO Auto-generated catch block
			e.printStackTrace();
		} catch (IOException e) {
			// TODO Auto-generated catch block
			e.printStackTrace();
		}
	}
}
Design pattern:Adapter 设计模式:适配器
Categories: Java; Tagged with: Design Pattern • Java • 设计模式; @ July 19th, 2012 11:04Adapter pattern(Wrapper pattern), is a design pattern that allows classes to work together, those classes can not work normally because they have incompatible interface.
For example, you travel from US to China, you need to use an adapter so that you charger can work, because they have different standard.
There are two types, one is Class level, and the other is Object(Instance) level.
Class Adapter pattern:
“The adapter is created by implementing or inheriting both the interface that is expected and the interface that is pre-existing. It is typical for the expected interface to be created as a pure interface class, especially in languages such as Java that do not support multiple inheritance”

(http://en.wikipedia.org/wiki/Adapter_pattern)
Object Adapter pattern
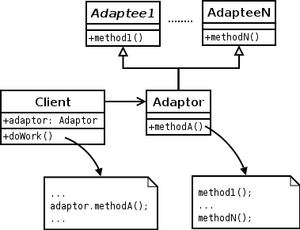
Adapter contains an instance of the class it wraps, so that the adapter can delegate the request to warped instance.


