Which method will be called? about Overriding and Overloading in Java
Categories: Java; Tagged with: Java • Overloading • Overriding • Polymorphism; @ May 13th, 2012 15:02Here are two class: Animal and Dog, Dog extends from Animal:
package scjp.liguoliang.com;

public class Animal {

	private String type = "Dog";
	public String name = "Animal";

	public String getType() {
		return type;
	}

	public void eat() {
		System.out.println(name + ", Animal eat...");
	}
}
package scjp.liguoliang.com;

public class Dog extends Animal {

	private String type = "Dog";
	public String name = "Dog";


	public String getType() {
		return type;
	}

	public void eat() {
		System.out.println(name + ", Dog eat...");
	}
}
And here is the test codes:
	public static void main(String[] args) {
		Dog dog = new Dog();
		Animal animalDog = new Dog(); // New dog, but type is Animal.

		System.out.println(dog.name);
		System.out.println(dog.getType());
		dog.eat();

		System.out.println(animalDog.name);
		System.out.println(animalDog.getType());
		animalDog.eat();


		System.out.println("\nWe are going to test overloading:");
		OverLoadingTest overLoadingTest = new OverLoadingTest();
		overLoadingTest.testEat(animalDog);
		overLoadingTest.testEat(dog);
	}


	public void testEat(Animal animal) {
		System.out.println("Test Animal eat");
	}

	public void testEat(Dog dog) {
		System.out.println("Test Dog eat");
	}
Here is the output:
Dog
Dog
Dog, Dog eat...
Animal // Get the property by reference Type, so print the name of ‘Animal’
Dog // Polymorphism, call the method of the instance in run time;
Dog, Dog eat...
We are going to test overloading:
Test Animal eat // Compiler will decide which method will be called by reference type when compiling.
Test Dog eat
In summary:
1. overriding: Polymorphism is for instance method, so an animal type reference to a dog Object will call dog’s method; but for properties, will use animals.
2. overloading: which method will be called has been determined when compiling by the reference type.
Debug remote JBoss application in Eclipse 在Eclipse中远程调试JBoss应用
Categories: Java; Tagged with: Debug • Java • JBoss; @ February 17th, 2012 22:50#1. Config JBoss configuration file:
jboss-5.1.0.GA\bin: modify the configuration run.conf.bat(Windows) or run.conf(Linux), remove the comment at the start of the line, and set suspend=n:
(remove: rem or # )set “JAVA_OPTS=%JAVA_OPTS% -Xrunjdwp:transport=dt_socket,address=8787,server=y,suspend=n”
Start the server;
#2. Debug the project in Eclipse:
Java 正则表达式替换小心: $ / 符号
Categories: Java; Tagged with: Java • Matcher.quoteReplacement • RegEx; @ September 3rd, 2011 14:34尝试使用正则表达式处理内容时, 需要小心替换字符串中是否包含:$ or /, 譬如:
Pattern pattern = Pattern.compile(“\\{C0\\}”);
Matcher matcher = pattern.matcher(“Price: [{C0}].”);
System.out.println(matcher.replaceAll(“€6.99”));
System.out.println(matcher.replaceAll(“$6.99”));
输出:
Price: [€6.99].
Exception in thread “main” java.lang.IndexOutOfBoundsException: No group 6
at java.util.regex.Matcher.group(Unknown Source)
at java.util.regex.Matcher.appendReplacement(Unknown Source)
at java.util.regex.Matcher.replaceAll(Unknown Source)
at TestExcel2Xml.main(TestExcel2Xml.java:10)
可见第一个replaceAll是正常工作的, 但第二个中的美元符号就出问题了.
Java API:
Note that backslashes (\) and dollar signs ($) in the replacement string may cause the results to be different than if it were being treated as a literal replacement string. Dollar signs may be treated as references to captured subsequences as described above, and backslashes are used to escape literal characters in the replacement string.
可以使用Matcher.quoteReplacement(String)对替换内容进行预先处理: (API)
Returns a literal replacement String for the specified String. This method produces a String that will work use as a literal replacement s in the appendReplacement method of the Matcher class. The String produced will match the sequence of characters in s treated as a literal sequence. Slashes (‘\’) and dollar signs (‘$’) will be given no special meaning.
修改为:
Pattern pattern = Pattern.compile(“\\{C0\\}”);
Matcher matcher = pattern.matcher(“Price: [{C0}].”);
System.out.println(matcher.replaceAll(“€6.99”));
System.out.println(matcher.replaceAll(Matcher.quoteReplacement(“$6.99”)));
正确输出:
Price: [€6.99].
Price: [$6.99].
基于Athena framework快速创建Java Flex应用入门教程
Categories: Flex • Java; Tagged with: Athena Framework • BlazeDS • Flex • Flex企业级框架 • Java; @ April 23rd, 2011 22:05本教程简要介绍基于Athena框架的Flex应用开发. 假定你已具备基本的Flex + Java开发技能. 我们将使用Athena框架快速创建一个类似与Adobe Flex Test Drive的小应用(链接), 该应用与Adobe Flex Test Drive的不同之处在于: Flex端采用了Athena Framework, 并基于Athena Framework增加了服务器端的支持.
由于时间有限, 本例仅展示环境配置, 基于Athena Console管理数据结构并自动生成Java, Flex代码, 通过简单编程实现基本功能.
所有的代码均可通过: http://code.google.com/p/athenahelloworld/ checkout(不含lib).
本文分三部分:
- 基于Athena框架的Flex入门教程(1) 环境配置
- 基于Athena框架的Flex入门教程(2)配置Entity, 自动生成Java端, Flex端代码
- 基于Athena框架的Flex入门教程(3) 编写Java Flex两端代码,运行程序
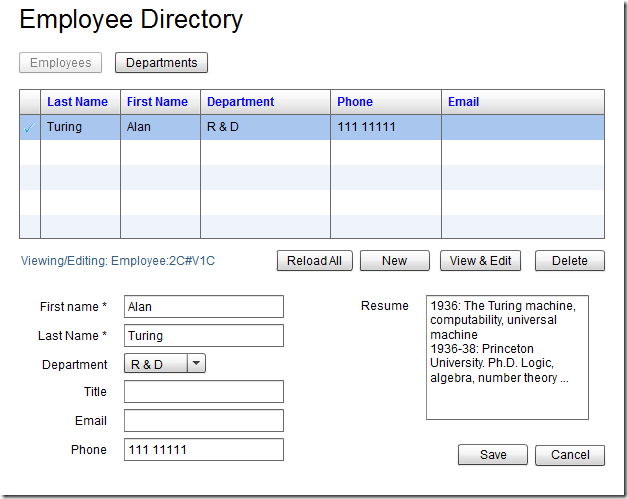
下图为Athena framework官方提供的Test Drive最后效果图, 可进行Employ的CRUD, 并列出Department的所有employ.
基于Athena框架的Flex入门教程(3) 编写Java Flex两端代码,运行程序
Categories: Flex • Java; Tagged with: Athena Framework • BlazeDS • Flex • Java; @ April 23rd, 2011 20:04在教程1中已经创建好了Java工程及Flex工程;
在教程2中已经使用AthenaConsole及metadata workbench配置好了数据库,并进行了建模及代码生成;
本节我们将编写Java端及Flex端代码, 并最终运行程序;
服务器端编程 – 创建被配置Service
在Athena框架下, Flex可以直接呼叫Java端的Service. 除了Service Class本身之外, 还需要在xml文件中声明该类, 以便Flex端呼叫使用.
创建Service – DeptService.java
Athena框架下的ServiceClass负责响应Flex端的请求, 与数据库进行交互. 我们可继承org.athenasource.framework.eo.web.service.AbstractService类以快速创建Service.
package com.liguoliang.helloworld.service;

import java.util.List;

import org.athenasource.framework.eo.core.EOContext;
import org.athenasource.framework.eo.query.EJBQLSelect;
import org.athenasource.framework.eo.web.service.AbstractService;

public class DeptService extends AbstractService {

	/**
	 * 加载Department列表
	 * @return
	 */
	public List<Object> loadDepts() {
		EOContext eoContext = createEOContext(); // 创建Athena EoContext;

		String strEJBQL = "SELECT dept FROM Department dept"; // 加载所有Department;
		EJBQLSelect select = eoContext.createSelectQuery(strEJBQL);

		return select.getResultList(); // 执行EJBQL, 并返回所有数据;
	}
}
在Service配置文件中声明Service
为了便于Flex端呼叫Service, 我们需要事先创建eo-services.xml配置文件, 该文件位于: WEB-INFO 根目录下, 该目录下有我们在教程1中介绍的eo-config.xml, flex-services.config.xml文件.
我们需要创一个专门存放Service的xml文件: eo-services.xml, 该文件的样例请参考官方文档, 我们增加刚才创建的DeptService:
<service class=”com.liguoliang.helloworld.service.DeptService;” name=”deptService” description=”AthenaFramework HelloWorld” />
Java端工程目录见文末附图;
至此, 我们已经创建并配置好了DeptService, 万事俱备, 只等Flex端来Call了!
Flex端编程
在Flex端工程中需要将athena-flx-2.0.0.swc放入labs目录.
将在Application创建完毕后立即初始化EoService, 基于EoService可呼叫Java端定义的Service.
			import com.liguoliang.helloworld.Department;

			import mx.collections.ArrayCollection;
			import mx.controls.Alert;
			import mx.events.FlexEvent;

			import org.athenasource.framework.eo.core.EOService;
			import org.athenasource.framework.eo.core.ioc.EOServiceLocator;
			import org.athenasource.framework.eo.remoting.event.EventEOService;
			import org.athenasource.framework.eo.remoting.event.EventRemoteOperationError;
			import org.athenasource.framework.eo.remoting.event.EventRemoteOperationSuccess;

			/** EOService */
			protected var eoService:EOService;

			/**
			 * 创建完毕后响应, 初始化EOService(将会加载Metadata基础数据)
			 */
			protected function onCreationComplete(event:FlexEvent):void {
				// Initialize eoService
				eoService = new EOService("http://localhost:8080/AthenaHelloWorld/messagebroker/amf", "eo", 2, true, onEoServiceEvent);
				// Set Service Locator
				EOServiceLocator.getInstance().eoService = eoService;
			}

			/**
			 * EoService初始化完毕, 如果成功则立即加载Department列表.
			 */
			protected function onEoServiceEvent(event:EventEOService):void {
				if(event.kind == EventEOService.KIND_LOGIN_SUCCESS) {
					trace("Metadata 加载成功");
					loadDepts(); // 加载列表
				}else if(event.kind == EventEOService.KIND_LOGIN_ERROR || event.kind == EventEOService.KIND_META_LOAD_ERROR) {
					Alert.show("ERROR: " + event.errorMessage);
				}
			}

			// 加载Department列表 - EoService已初始化完毕, 在任意位置使用EOServiceLocator.getInstance().eoService即可拿到eoService实例;
			// 使用eoService呼叫Java端创建的Service.
			private function loadDepts():void {
				// 注意首个参数serviceName - 需要与Java端eo-service.xml中配置的Service name相同.
				EOServiceLocator.getInstance().eoService.invokeService("deptService", "loadDepts", [], onLoadDeptsSuccess, onLoadDeptsError);
			}

			// 加载成功后响应.
			private function onLoadDeptsSuccess(e:EventRemoteOperationSuccess):void {
				var deptsAC:ArrayCollection = e.data as ArrayCollection;
				trace("加载到的Dept列表长度: " + deptsAC.length);
				datagirdDepts.dataProvider = deptsAC; // deptsAC中数据为Department类的实例.
			}

			private function onLoadDeptsError(e:EventRemoteOperationError):void {
				Alert.show(e.exceptionDetails, "加载失败!");
			}
启动Java服务器, 运行Flex应用
枯燥的配置只是为了更简单流畅的开发, 终于到了真正运行的时刻了
(在运行之前, 为了方便演示, 我已在数据库中插入了两条测试记录)
- 启动Java端服务器
- 运行Flex端应用
运行成功:
服务器端都做了什么? EJBQL被翻译成了什么SQL?
可通过配置Java端src根目录下log4j.properties文件以查看更多debug信息(如不存在请创建)
[http-8080-1] INFO uery.EJBQLSelect – EJBQL: SELECT dept FROM Department dept
[http-8080-1] INFO uery.EJBQLSelect – SQL: SELECT dept.department_ID, dept.version, dept.status, dept.ORG_ID, dept.deptName FROM Department dept WHERE dept.status <> 4
下载本例代码 & 走的更远
本例代码可通过Google code checkout: http://code.google.com/p/athenahelloworld/
其中包含: Java, Flex工程文件(均不含lib), 数据库sql文件(包含在Java工程中),
可下载Athena framework官方示例程序进一步体验: http://athenasource.org/flex/basic-tutorial.php
附录: helloworld最终目录结构:


