Flex BlazeDS Java JDBC MySql 快速配置
Categories: Flex • Java; Tagged with: ActionScript • BlazeDS • Flex • Java • JDBC • MySQL; @ February 20th, 2009 16:481. Java – JDBC – MySql
1. 装好MySql, 启动服务.
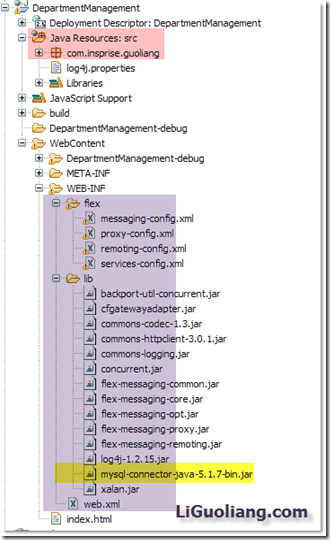
2. 将mysql-connector-java-5.1.7-bin.jar 拖入WEB-INF/lib下.
搞定.
2. Java端BlazeDS配置
1. Java端:
将BlazeDS压缩包内的WEB-INF里面的东西拷贝工程内的WEB-INF下的相应位置中.[ Flex目录下有四个xml配置文件, lib下是需要使用的jar] 包括web.xm
2. 配置services-config.xml中channels标签中的内容:
                false


true
4
其中, http://localhost:8080/DepartmentManagement/ 是该Web工程的地址 [可在web-content下建立一空index.html, 运行后查看地址便可]
3. 编写Java类, 并配置remoting-config.xml文件的<service>标签下, 增加服务, 如下:
com.insprise.guoliang.DepartmentManagement
3. Flex端建立工程
1. 建立 Flex与Java通信载体RemoteObject
为方便在整个工程中使用, 可建立一个Singleton – 关于AS中的Singleton可见: http://liguoliang.com/2008/10/128/
在该类中建立RemoteObject.
首先需要确定RemoteObject的destination, 在本例中 为”DepartmentManagement”; – 在remoting-config.xml中已配置.
其次需要确定ro的channel – 本例中为:”http://localhost:8080/DepartmentManagement/messagebroker/amf"; - 在services-config.xml中已配置
代码:
	public static const DEFAULT_DEST:String = "DepartmentManagement";
	public static const DEFAULT_CHANNEL_URL:String = "http://localhost:8080/DepartmentManagement/messagebroker/amf";
	private static var _ro:RemoteObject;

	/**
	 * Constractor - Singleton
	 */
	 public function AppContext():void {
	 	throw new Error("AppContext is Singleton!");
	 }

	/**
	 * Get RemoteObject
	 */
	public static function getRemoteObject():RemoteObject {
		if(_ro == null) {
			_ro = createRemoteObject(DEFAULT_DEST, DEFAULT_CHANNEL_URL);
		}
		return _ro;
	}

	/**
	 * Constructs a new remote object with new channel.
	 * @param roDestination Destination of the RemoteObject; should match a destination name in the services-config.xml file.
	 * @param channelURI the URI used to create the whole endpoint URI for this channel; this uri can be relative uri (to the folder containing the SWF).
	 * @param channelId the id of the channel, if set to null, a random Id will be assigned.
	 */
	protected static function createRemoteObject(roDestination:String, channelURI:String, channelId:String = null):RemoteObject {
		var channelSet:ChannelSet = new ChannelSet();
		var channel:AMFChannel = new AMFChannel(channelId == null ? "channel-" : channelId, channelURI);	//Create new Channel
		channelSet.addChannel(channel);

		var ro:RemoteObject = new RemoteObject(roDestination);
		ro.channelSet = channelSet;

		return ro;
	}
4 配置完成,.
在Java端建立相关的Class,
启动服务器.
在Flex端通过 Appcontext.getRemoteObject.getOperation(“方法名称”)来调用服务器端方法.
具体实例:
Java端的Class – 通过JDBC 读取 MySql中数据:
	/**
	 * Load all Department and return an ArrayList
	 * @return
	 */
	public ArrayList loadDepartments() {
		ArrayList departmentsAL = new ArrayList();
		log.info("Loading Departments...");
		try {
			//Get Connection
			Connection conn = JdbcUtilities.getConnection();
			//Create statement
			String sql = " SELECT * FROM Department d ORDER BY d.Department_ID";
			PreparedStatement ps = conn.prepareStatement(sql);

			ResultSet res = ps.executeQuery();
			log.debug("Exectuing: " + sql);
			while (res.next()) {
				int id = res.getInt("Department_ID");
				String name = res.getString("name");

				Department dp = new Department();
				dp.setId(id);
				dp.setName(name);
				departmentsAL.add(dp);
				log.debug("从数据库获得部门:  " + dp);
			}
			JdbcUtilities.closeConn(res, ps, conn);
			log.info("加载部门信息结束, 共加载部门: " + departmentsAL.size());
		} catch (Exception e) {
			log.error("SQL Error", e);
			throw new Error(e);
		}
		return departmentsAL;

	}
Flex端的代码:
		/**
	 * Load the Department's Employee
	 */

	private var op:AbstractOperation;
	public function loadEmployees():void {
		op = AppContext.getRemoteObject().getOperation("loadEmployees");	//获得Operation
		 op.arguments = [id];	//设定参数
		 var at:AsyncToken = op.send();	//Send
		 at.addResponder(this);	//为本实例增加responder

      }
Flex端responder剩余代码见:http://liguoliang.com/2009/02/777/
运行Flex工程, Flex取得RemoteObject, 然后通过channel建立到destination的连接,由Java读取数据库中信息, 并返回给Flex.
Flex端调用Java服务的过程
Categories: Flex; Tagged with: ActionScript • BlazeDS • Flex • Java; @ February 20th, 2009 11:141. get Operation
2. set arguments
3. AddResponder, Send();
如下:
	private var op:AbstractOperation;
	public function loadEmployees():void {
		op = AppContext.getRemoteObject().getOperation("loadEmployees");	//获得Operation
		 op.arguments = [id];	//设定参数
		 op.send();
		 var at:AsyncToken = op.send();	//Send
		 at.addResponder(this);	//为本实例增加responder
      }
//使用当前类响应, 则应实现IResponder接口, 要实现两个方法, 如下:
//---------------------Responder-------------------------------
	public function result(responderResult:Object):void {
		var resultEvent:ResultEvent = responderResult as ResultEvent;//转换
		var ac:ArrayCollection = resultEvent.result as ArrayCollection;//获得Result
		log.debug("已读取到 " + this + "的职员列表, 职员数目为: " + ac.length);
	}

	public function fault(data:Object):void {
		throw new Error("远程操作失败");
	}
原先的错误方法:
	private var op:AbstractOperation;
	public function loadEmployees():void {
		op = AppContext.getRemoteObject().getOperation("loadEmployees");	//获得Operation
		 op.arguments = [id];	//设定参数
		 op.addEventListener(ResultEvent.RESULT, onSqlResult,false, 0, true);
		 op.send();
		// var at:AsyncToken = op.send();	//Send
		 //at.addResponder(this);	//为本实例增加responder
      }

	private function onSqlResult(e:ResultEvent):void {
		var ac:ArrayCollection = e.result as ArrayCollection;
		for each(var emp:Employee in ac) {
			emp.department = this;
			employeeAC.addItem(emp);
		}
		log.debug("已读取到 " + this + "的职员列表, 职员数目为: " + ac.length);
		op.removeEventListener(ResultEvent.RESULT, onSqlResult);//更错误的方法是没有remove Listener
	}
这样导致该方法被呼叫时, op都会被监听, 成功后取消监听, 如果不取消监听, 则会出现如下输出信息:
第一次调用:
[DEBUG] Department 已读取到 Dep1的职员列表, 职员数目为: 2
第二次调用:
[DEBUG] Department 已读取到 Dep1的职员列表, 职员数目为: 2
[DEBUG] Department 已读取到 Dep2的职员列表, 职员数目为: 2
第三次调用:
[DEBUG] Department 已读取到 Dep1的职员列表, 职员数目为: 0
[DEBUG] Department 已读取到 Dep2的职员列表, 职员数目为: 0
[DEBUG] Department 已读取到 Department3的职员列表, 职员数目为: 0
在此情况下, op可视为一类操作, 这样在使用op[他会有很多个实例, 会有很多个对应的监听函数]监听之后, 每个实例的Result的返回都会引发所有实例的Listener运行. 因此会出现上面的状况.
BlazeDS配置实例
Categories: Flex; Tagged with: BlazeDS • Flex • Java; @ August 30th, 2008 23:55[小站博客均为原创, 转载请保留以下信息:
作者:http://liguoliang.com 欢迎访问:Adobe上海用户组: http://riashanghai.com ]
1.什么是BlazeDS
BlazeDS is the server-based Java remoting and web messaging technology that enables developers to easily connect to back-end distributed data and push data in real-time to Adobe® Flex® and Adobe AIR™ applications for more responsive rich Internet application (RIA) experiences.
BlazeDS consists of three key services:
1.The Remoting Service allows your Flex application to directly invoke methods of Java objects deployed in your application server.
2.The Message Service provides a publish/subscribe infrastructure that allows your Flex application to publish messages and subscribe to a messaging destination, enabling the development of real-time data push and collaborative applications.
3.The Proxy Service allows your Flex application to make cross-domain service requests in a secure and controlled manner. In other words, it allows your Flex application to access a service available on a different domain than the domain from where the application was downloaded (without having to depl
oy a crossdomain.xml policy file on the target domain).[Christophe Coenraets Adobe http://www.adobe.com/devnet/livecycle/articles/blazeds_gettingstarted.html]
2.配置BlazeDS,并使之正常运作
2.1 准备工作
FlexBuilder,Tomcat,Eclipse.
在此之前,你至少需要学会启动或停止Tomcat服务器,并了解它的一些大致情况,同时你需要学会编写一个简单的java类,并编译它.
BlazeDS:
BlazeDS首页:http://opensource.adobe.com/wiki/display/blazeds/BlazeDS,有关于BlazeDS的详细介绍与相关文档,下载地址.
BlazeDS下载地址:http://download.macromedia.com/pub/opensource/blazeds/blazeds_turnkey_3-0-0-544.zip
BlazeDS开发指南下载地址:http://livedocs.adobe.com/blazeds/1/blazeds_devguide/blazeds_devguide.pdf
2.2 配置BlazeDS
将zip包内的blazeds.war文件解压到应用服务器的部署目录下,如:[tomcat-home]\webapps.
重启Tomcat
简要介绍下blazeds文件夹:
\WEB-INF配置文件包,内有:
\classes 用来放置Flex应用程序需要使用到的Java class
\flex 有四个XML格式的配置文件,现在我们只需要了解remoting-config.xml,在该文件中添加destination来配置Flex应用程序 与Java class的连接,通过这个文件,架起Flex程序与Java Class之间的桥梁.
3.测试
3.1创建一个新的Java项目来配置BlazeDS,向web应用中添加Java类。
在Eclipse中创建新工程,选择从现有资源中创建,命名为“HelloWorld_server” ,使用先前部署的BlazeDS.WAR的WEB_INF文件夹路径,如:[tomcat-home]\webapps\blazeds\WEB-INF \,在build路径下添加src目录 ,将WEB-INF/classes目录作为输出目录,创建一个名为HelloWorld.java的新Java类,类的定义为:
- public class HelloWorld {
- public String sayHello(String name) {
- return “hello, “ + name;
- }
- }
如果你不太熟悉这一步操作,也可以手工编写该java文件,使用javac命令编译为java class文件.
但不论如何,产生的HelloWorld.class必须在WEB-INF/classes目录中.
3.2配置BlazeDS
配置BlazeDS,使它支持Flex与Java进行远程通信。配置WEB-INF/flex文件夹下的config.xml文件,具体配置可参照如下代码:
- <destination id=“HelloWorld”>
- <properties>
- <source>HelloWorld</source>
- </properties>
- </destination>
重新启动Tomcat;
3.3新建一个Flex应用程序,测试连接
创建一个新Flex项目,将项目命名为“HelloWorld_client”,应用服务器类型则选择“J2EE” ,ProjectLocation指用于存放工程文件的目录,指定为你想存放的位置即可.
选择“Use remote object access service”和LiveCycle Data Services
Next:
将根ULR声明为:http://localhost:8080/blazeds(端口号由应用服务器配置决定)
在Tomcat运行的情况下,检查配置的结果应为:The web root folder and root URL are valid.
确定配置并点击“完成”
将HelloWorld_client.mxml修改为如下:
- <?xml version=“1.0” encoding=“utf-8”?>
- <mx:application xmlns:mx=“http://www.adobe.com/2006/mxml”>
- <mx:remoteobject id=“ro” destination=“HelloWorld”>
- <mx:textinput id=“n” change=“ro.sayHello(n.text)”>
- <mx:label text=“{ro.sayHello.lastResult}”>
- </mx:label></mx:textinput></mx:remoteobject></mx:application>
运行该应用,在文本框中输入内容,随着文本框内容改变,显示的内容也随着改变.如下图:
解说:
该Flex应用使用RemoteObject来与服务器通信。当用户在文本框中输入内容时,文本框的触发并广播 change事件,从而通过已配置的RemoteObject向服务器发出请求。服务器向已经配置的的远程Java类发送请求,返回 “Hello,”+发送值的字符串。在对象返回值的时候,这个返回值会系列化到AMF中,进而返回给Flex应用。RemoteObject将该值赋值给 ro.lastResult,该过程完成后,Label通过RemoteObject上的result事件获得Hello riashanghai.com,并打印出来.
4.实际应用
在之前发布的<完整Flex程序+详细解释之便条管理系统(Tree/回溯/XML/Event) Annotated Flex Sample Application: Note Management>中,我们简要的介绍了将数据存储于SharedObejct中的简单便条管理系统,现在我们开始着手开发存储与服务器端的应用.
简要描述:通过分析,只需要修改先前程序的loadXML与SaveXML两个函数即可实现存储于服务器端.
简单起见,服务器端仍旧使用XML存储数据.
在server端,编写一个xmlserver类,该类将实现loadxml与savexml的功能.
在client端,使用RemoteObject与Java进行通信.


