Flex Tree样式: 如何修改Tree的Icon
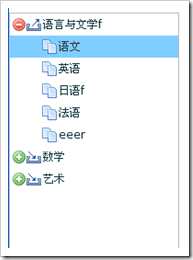
Categories: Flex; Tagged with: ActionScript • Flex • Icon • Tree; @ March 12th, 2009 10:50可以通过设定Tree的样式来更改Tree的icon. 如下
		_treeLAAndSub = new Tree();
		_treeLAAndSub.iconField = "hahah@#$@#$";
		_treeLAAndSub.setStyle("folderClosedIcon", ImagesForActions.iconImport);	//文件夹关闭时
		_treeLAAndSub.setStyle("folderOpenIcon", ImagesForActions.iconExport);	//文件夹打开

		_treeLAAndSub.setStyle("defaultLeafIcon", ImagesForActions.iconCopy);	// 叶子
		_treeLAAndSub.setStyle("disclosureOpenIcon", ImagesForActions.iconRemove);	//文件夹打开时旁边的图示
		_treeLAAndSub.setStyle("disclosureClosedIcon", ImagesForActions.iconAdd);	//文件夹关闭时旁边的图示
BlazeDS Flex端常用方法总结 及 ResultEvent分析
Categories: Flex; Tagged with: ActionScript • BlazeDS • Flex • ResultEvent; @ February 21st, 2009 20:241 .基本使用:
	private var op:AbstractOperation;
	public function loadEmployees():void {
		op = AppContext.getRemoteObject().getOperation("loadEmployees");	//获得Operation
		 op.arguments = [id];	//设定参数
		 var at:AsyncToken = op.send();	//Send
		 at.addResponder(this);	//为本实例增加responder

      }

//---------------------实现 IResponder-------------------------------
	public function result(responderResult:Object):void {
		var resultEvent:ResultEvent = responderResult as ResultEvent;
		var ac:ArrayCollection = resultEvent.result as ArrayCollection;//result为服务器返回的数据
		log.debug("已读取到 " + this + "的职员列表, 职员数目为: " + ac.length);
	}

	public function fault(data:Object):void {
		throw new Error("远程操作失败");
	}
2. 另外可通过外置Responder实例来响应结果, 同时在实例中dispatch Event, 可实现在当前类中响应服务器端返回数据.
	//Listener - onButtonDelClicked
	private function onButtonDelClicked(e:MouseEvent):void {
		var op:AbstractOperation = AppContext.getRemoteObject().getOperation("delEmp");
		log.info("Deleteing...");
			 op.arguments = [datagridEmpList.selectedItem as Employee];
			 var at:AsyncToken = op.send();
			 var rs:OperationResponder = new OperationResponder();//增加Responder实例
			 rs.addEventListener(OperationResultEvent.OPERATION_COMPLETE, onOperationSuccess);//监听由Responder派发的Custom Event
			 at.addResponder(rs);//为AsyncToken增加Responder
	}

//-----------------------on RemoteOperationSuccess - SaveNew - UPdate - Delete - load Department- 监听多个操作的Event-----------------
	private function onOperationSuccess(e:OperationResultEvent):void {
		var resultEvent:ResultEvent = e.resultData as ResultEvent;
		var resultEventATMessage:RemotingMessage = resultEvent.token.message as RemotingMessage;
		var operationName:String = resultEventATMessage.operation;
		if(operationName == "saveEmpToDB") {//新建保存
			//....
		}else if(operationName == "updateEmp"){	//更新
			//....
			}
		}else if(operationName == "delEmp") {//删除
			var deletedEmp:Employee = resultEventATMessage.body[0];
			log.info("已成功删除职员: " + deletedEmp.name);
		}else if(operationName == "loadDepartments") {	//加载部门信息
		//...
		}
	}
OperationResponder类:
package com.insprise.dept.view
{
/**
 * Select Departments Responder
 */
 [Event(name = "OperationComplete", type="com.insprise.dept.event.OperationResultEvent")]
public class OperationResponder  extends EventDispatcher implements IResponder
{
	public function OperationResponder() {
		super();
	}

	public function result(data:Object):void {
//		var resultEvent:ResultEvent = data as ResultEvent;
//		var ac:ArrayCollection = resultEvent.result as ArrayCollection;
		dispatchEvent(new OperationResultEvent(data));
	}

	public function fault(info:Object):void {
		throw new Error("服务器出错 - 调用服务器端方法失败" +  ErrorMessage);
	}
}//end of class
}//end of package
OperationResultEvent类:
package com.insprise.dept.event
{
/**
 * when Operation Success, and it's responder can dispatch this event
 */
public class OperationResultEvent extends Event
{
	public static const OPERATION_COMPLETE:String = "OperationComplete";
	private var _resultData:Object;

	/**
	 * Constructor
	 */
	public function OperationResultEvent(resultData_:Object) {
		super(OPERATION_COMPLETE, false, false);
		_resultData = resultData_;
	}

	/**
	 * Getter
	 */
	 public function get resultData():Object {
	 	return _resultData;
	 }

	/**
	 * Override - MUST
	 */
	 override public function clone():Event {
	 	return new OperationResultEvent(_resultData);
	 }

	/**
	 * OPTIONAL
	 */
	 override public function toString():String {
	 	return formatToString(OPERATION_COMPLETE, "_resultData");
	 }
}//end of class
}//end of package
3: ResultEvent常用操作:
ResultEvent由AsyncToken的applyResult方法派发, 将该Event传递至Responder的result方法中.
ResultEvent的属性:
    /**
     * Creates a new ResultEvent.
     * @param type The event type; indicates the action that triggered the event.
     * @param bubbles Specifies whether the event can bubble up the display list hierarchy.
     * @param cancelable Specifies whether the behavior associated with the event can be prevented.
     * @param result Object that holds the actual result of the call.
     * @param token Token that represents the call to the method. Used in the asynchronous completion token pattern.
     * @param message Source Message of the result.
     */
    public function ResultEvent(type:String, bubbles:Boolean = false, cancelable:Boolean = true,
                                result:Object = null, token:AsyncToken = null, message:IMessage = null)
    {
        super(type, bubbles, cancelable, token, message);

        if (message != null && message.headers != null)
            _statusCode = message.headers[AbstractMessage.STATUS_CODE_HEADER] as int;

        _result = result;
    }
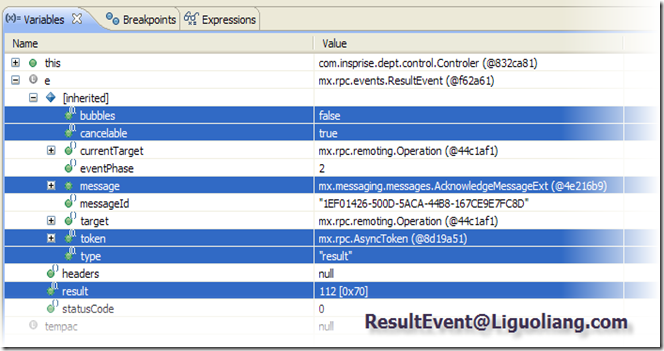
resultEvent.result存放有当前op返回值, 可通过ObjectUtils.toString(resultEvent.result)来查看其类型及信息
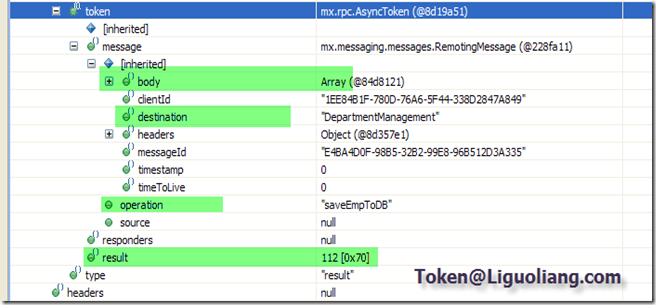
其中token中存放有如下具体信息:
Message中的内容:
body中存放有当前Operation的很多参数, 可使用如下方法调用Message:
var resultEventATMessage:RemotingMessage = resultEvent.token.message as RemotingMessage;
然后可通过resultEventATMessage.operation / desination/body[*]等来调用op/destination名字及op的参数.
在Operation中定义了message的内容:
以下代码来自mx.rpc.remoting.Operaiton
    override public function send(... args:Array):AsyncToken
    {
        if (!args || (args.length == 0 && this.arguments))
        {
            if (this.arguments is Array)
            {
                args = this.arguments as Array;
            }
            else
            {
                args = [];
                for (var i:int = 0; i < argumentNames.length; ++i)
                {
                    args[i] = this.arguments[argumentNames[i]];
                }
            }
        }

        var message:RemotingMessage = new RemotingMessage();
        message.operation = name;
        message.body = args;
        message.source = RemoteObject(service).source;

        return invoke(message);
    }

}
Flex BlazeDS Java JDBC MySql 快速配置
Categories: Flex • Java; Tagged with: ActionScript • BlazeDS • Flex • Java • JDBC • MySQL; @ February 20th, 2009 16:481. Java – JDBC – MySql
1. 装好MySql, 启动服务.
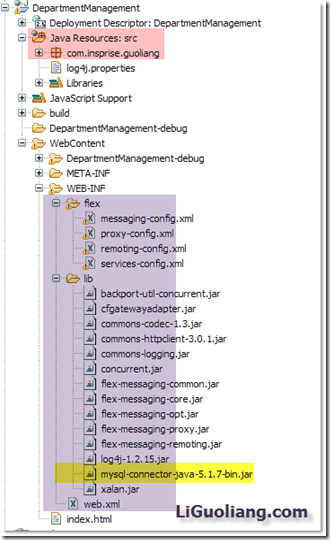
2. 将mysql-connector-java-5.1.7-bin.jar 拖入WEB-INF/lib下.
搞定.
2. Java端BlazeDS配置
1. Java端:
将BlazeDS压缩包内的WEB-INF里面的东西拷贝工程内的WEB-INF下的相应位置中.[ Flex目录下有四个xml配置文件, lib下是需要使用的jar] 包括web.xm
2. 配置services-config.xml中channels标签中的内容:
                false


true
4
其中, http://localhost:8080/DepartmentManagement/ 是该Web工程的地址 [可在web-content下建立一空index.html, 运行后查看地址便可]
3. 编写Java类, 并配置remoting-config.xml文件的<service>标签下, 增加服务, 如下:
com.insprise.guoliang.DepartmentManagement
3. Flex端建立工程
1. 建立 Flex与Java通信载体RemoteObject
为方便在整个工程中使用, 可建立一个Singleton – 关于AS中的Singleton可见: http://liguoliang.com/2008/10/128/
在该类中建立RemoteObject.
首先需要确定RemoteObject的destination, 在本例中 为”DepartmentManagement”; – 在remoting-config.xml中已配置.
其次需要确定ro的channel – 本例中为:”http://localhost:8080/DepartmentManagement/messagebroker/amf"; - 在services-config.xml中已配置
代码:
	public static const DEFAULT_DEST:String = "DepartmentManagement";
	public static const DEFAULT_CHANNEL_URL:String = "http://localhost:8080/DepartmentManagement/messagebroker/amf";
	private static var _ro:RemoteObject;

	/**
	 * Constractor - Singleton
	 */
	 public function AppContext():void {
	 	throw new Error("AppContext is Singleton!");
	 }

	/**
	 * Get RemoteObject
	 */
	public static function getRemoteObject():RemoteObject {
		if(_ro == null) {
			_ro = createRemoteObject(DEFAULT_DEST, DEFAULT_CHANNEL_URL);
		}
		return _ro;
	}

	/**
	 * Constructs a new remote object with new channel.
	 * @param roDestination Destination of the RemoteObject; should match a destination name in the services-config.xml file.
	 * @param channelURI the URI used to create the whole endpoint URI for this channel; this uri can be relative uri (to the folder containing the SWF).
	 * @param channelId the id of the channel, if set to null, a random Id will be assigned.
	 */
	protected static function createRemoteObject(roDestination:String, channelURI:String, channelId:String = null):RemoteObject {
		var channelSet:ChannelSet = new ChannelSet();
		var channel:AMFChannel = new AMFChannel(channelId == null ? "channel-" : channelId, channelURI);	//Create new Channel
		channelSet.addChannel(channel);

		var ro:RemoteObject = new RemoteObject(roDestination);
		ro.channelSet = channelSet;

		return ro;
	}
4 配置完成,.
在Java端建立相关的Class,
启动服务器.
在Flex端通过 Appcontext.getRemoteObject.getOperation(“方法名称”)来调用服务器端方法.
具体实例:
Java端的Class – 通过JDBC 读取 MySql中数据:
	/**
	 * Load all Department and return an ArrayList
	 * @return
	 */
	public ArrayList loadDepartments() {
		ArrayList departmentsAL = new ArrayList();
		log.info("Loading Departments...");
		try {
			//Get Connection
			Connection conn = JdbcUtilities.getConnection();
			//Create statement
			String sql = " SELECT * FROM Department d ORDER BY d.Department_ID";
			PreparedStatement ps = conn.prepareStatement(sql);

			ResultSet res = ps.executeQuery();
			log.debug("Exectuing: " + sql);
			while (res.next()) {
				int id = res.getInt("Department_ID");
				String name = res.getString("name");

				Department dp = new Department();
				dp.setId(id);
				dp.setName(name);
				departmentsAL.add(dp);
				log.debug("从数据库获得部门:  " + dp);
			}
			JdbcUtilities.closeConn(res, ps, conn);
			log.info("加载部门信息结束, 共加载部门: " + departmentsAL.size());
		} catch (Exception e) {
			log.error("SQL Error", e);
			throw new Error(e);
		}
		return departmentsAL;

	}
Flex端的代码:
		/**
	 * Load the Department's Employee
	 */

	private var op:AbstractOperation;
	public function loadEmployees():void {
		op = AppContext.getRemoteObject().getOperation("loadEmployees");	//获得Operation
		 op.arguments = [id];	//设定参数
		 var at:AsyncToken = op.send();	//Send
		 at.addResponder(this);	//为本实例增加responder

      }
Flex端responder剩余代码见:http://liguoliang.com/2009/02/777/
运行Flex工程, Flex取得RemoteObject, 然后通过channel建立到destination的连接,由Java读取数据库中信息, 并返回给Flex.
Flex小技巧: 设定Visiable = flase后重新排列UI
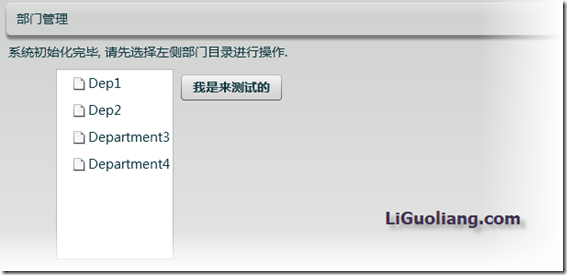
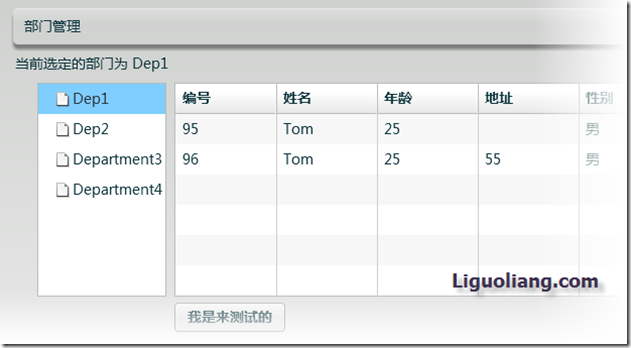
Categories: Flex; Tagged with: ActionScript • Flex • UI • visiable; @ February 20th, 2009 14:51初始化完成后:
点击左侧目录后:
具体实现:
初始化时:
		//Main - Maincontent
		vboxMainRightcontent = new VBox();
		empListContainer = new MainContent();
		empListContainer.visible = false;
		vboxMainRightcontent.addChild(empListContainer);
		//----------------------------加入button 测试 invilidate...----------
		testButton.label = "我是来测试的";
		vboxMainRightcontent.addChild(testButton);
		empListContainer.explicitHeight = 0;//注意此处, 设置为0方可不占用界面中的场地, 注意在visable设置为true之后还要进行相应的调整
		empListContainer.explicitWidth = 0;
左侧目录被点击后:
//---------------------------------Listeners------------------------
	//Listener - onListChange
	private function onDepListChange(e:ListEvent):void {
		_empListContainer.visible = _treeDepCat.selectedItem != null;

		if(_empListContainer.visible) {
		        _empListContainer.explicitHeight = undefined;//将explicitHeight复原, 否则虽然已经visable, 但其宽高都是0 仍无法可见.
		       _empListContainer.explicitWidth = undefined;
		}else {
			_empListContainer.explicitHeight = 0;
			_empListContainer.explicitWidth = 0;
		}
Flex: 对象编辑器的实现思路
Categories: Flex; Tagged with: ActionScript • Flex; @ February 20th, 2009 14:13要求: 如下编辑器:
编辑职员信息, 在验证其输入均合法之后, 并判断该对象是否需要保存 – 如果没有改变, 则不需要保存
分析:
1. 可继承Vbox等组件设计该Edtior
主要进行创建, 添加组件等操作…
2. 设定编辑对象, 设定正在编辑的职员, 并将相关信息输出到Editor中.
	/**
	 * 给定正在编辑的职员
	 */
	 public function set editorData(editorData_:Employee):void {
	 	_editorData = editorData_;

	 	textID.text = editorData_.id.toString();

	 	textName.text = editorData_.name;
	 	textAge.text = editorData_.age.toString();

	 	textAddress.text = editorData_.address;
		if(editorData_.isMale > 0) {
		 	if(editorData_.isMale != 1) {
		 		_radioNotMals.selected = true;
		 	}else {
		 		_radioIsMale.selected = true;
		 	}
		}else {//新建情况下  两个readiobutton均不选择  - 通过validation提示用户选择
			_radioIsMale.selected = false;
			_radioNotMals.selected = false;
		}

	 	if(editorData_.level > -1 ) {
	 		comboLevel.selectedIndex = editorData_.level;
	 	}else {//新建时
	 		comboLevel.selectedIndex = 0;
	 	}
	 	validateAll();
	 }
3. 验证输入数据, 是否合法
见: http://liguoliang.com/2009/02/780/
4. 判断对象是否有改动, 若有改动则enable Save Button. 否则继续unable.
	//---------------------------设置Save Button的可用性, 输入合法, 并且至少有一项是dirtyt的才能enable------------------------------
	private function setButton():void {
		if(_editorData == null) {
			return;
		}
		var allValidate:Boolean = (textName.errorString == null && textAge.errorString == null && hboxIsMale.errorString == null
								&& comboLevel.errorString == null);
		var anyOneDirty:Boolean = (_editorData.name != inputName || _editorData.age != inputAge || _editorData.isMale != inputIsMale()
								|| _editorData.level != inputLevel() || _editorData.address != inputAddress());
		if(allValidate && anyOneDirty) {
			buttonSave.enabled = true;
			return;
		}
		buttonSave.enabled = false;
	}
输入通过验证, 并检测到数据发生变化时, Enable Save Button:
按照MVC, Save及Cancel等操作应交由Control进行操作.
