Flex BlazeDS Java JDBC MySql 快速配置
Categories: Flex • Java; Tagged with: ActionScript • BlazeDS • Flex • Java • JDBC • MySQL; @ February 20th, 2009 16:481. Java – JDBC – MySql
1. 装好MySql, 启动服务.
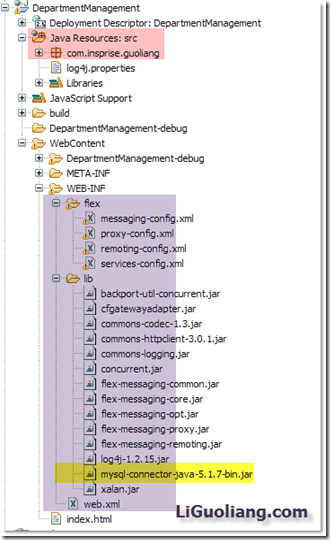
2. 将mysql-connector-java-5.1.7-bin.jar 拖入WEB-INF/lib下.
搞定.
2. Java端BlazeDS配置
1. Java端:
将BlazeDS压缩包内的WEB-INF里面的东西拷贝工程内的WEB-INF下的相应位置中.[ Flex目录下有四个xml配置文件, lib下是需要使用的jar] 包括web.xm
2. 配置services-config.xml中channels标签中的内容:
                false


true
4
其中, http://localhost:8080/DepartmentManagement/ 是该Web工程的地址 [可在web-content下建立一空index.html, 运行后查看地址便可]
3. 编写Java类, 并配置remoting-config.xml文件的<service>标签下, 增加服务, 如下:
com.insprise.guoliang.DepartmentManagement
3. Flex端建立工程
1. 建立 Flex与Java通信载体RemoteObject
为方便在整个工程中使用, 可建立一个Singleton – 关于AS中的Singleton可见: http://liguoliang.com/2008/10/128/
在该类中建立RemoteObject.
首先需要确定RemoteObject的destination, 在本例中 为”DepartmentManagement”; – 在remoting-config.xml中已配置.
其次需要确定ro的channel – 本例中为:”http://localhost:8080/DepartmentManagement/messagebroker/amf"; - 在services-config.xml中已配置
代码:
	public static const DEFAULT_DEST:String = "DepartmentManagement";
	public static const DEFAULT_CHANNEL_URL:String = "http://localhost:8080/DepartmentManagement/messagebroker/amf";
	private static var _ro:RemoteObject;

	/**
	 * Constractor - Singleton
	 */
	 public function AppContext():void {
	 	throw new Error("AppContext is Singleton!");
	 }

	/**
	 * Get RemoteObject
	 */
	public static function getRemoteObject():RemoteObject {
		if(_ro == null) {
			_ro = createRemoteObject(DEFAULT_DEST, DEFAULT_CHANNEL_URL);
		}
		return _ro;
	}

	/**
	 * Constructs a new remote object with new channel.
	 * @param roDestination Destination of the RemoteObject; should match a destination name in the services-config.xml file.
	 * @param channelURI the URI used to create the whole endpoint URI for this channel; this uri can be relative uri (to the folder containing the SWF).
	 * @param channelId the id of the channel, if set to null, a random Id will be assigned.
	 */
	protected static function createRemoteObject(roDestination:String, channelURI:String, channelId:String = null):RemoteObject {
		var channelSet:ChannelSet = new ChannelSet();
		var channel:AMFChannel = new AMFChannel(channelId == null ? "channel-" : channelId, channelURI);	//Create new Channel
		channelSet.addChannel(channel);

		var ro:RemoteObject = new RemoteObject(roDestination);
		ro.channelSet = channelSet;

		return ro;
	}
4 配置完成,.
在Java端建立相关的Class,
启动服务器.
在Flex端通过 Appcontext.getRemoteObject.getOperation(“方法名称”)来调用服务器端方法.
具体实例:
Java端的Class – 通过JDBC 读取 MySql中数据:
	/**
	 * Load all Department and return an ArrayList
	 * @return
	 */
	public ArrayList loadDepartments() {
		ArrayList departmentsAL = new ArrayList();
		log.info("Loading Departments...");
		try {
			//Get Connection
			Connection conn = JdbcUtilities.getConnection();
			//Create statement
			String sql = " SELECT * FROM Department d ORDER BY d.Department_ID";
			PreparedStatement ps = conn.prepareStatement(sql);

			ResultSet res = ps.executeQuery();
			log.debug("Exectuing: " + sql);
			while (res.next()) {
				int id = res.getInt("Department_ID");
				String name = res.getString("name");

				Department dp = new Department();
				dp.setId(id);
				dp.setName(name);
				departmentsAL.add(dp);
				log.debug("从数据库获得部门:  " + dp);
			}
			JdbcUtilities.closeConn(res, ps, conn);
			log.info("加载部门信息结束, 共加载部门: " + departmentsAL.size());
		} catch (Exception e) {
			log.error("SQL Error", e);
			throw new Error(e);
		}
		return departmentsAL;

	}
Flex端的代码:
		/**
	 * Load the Department's Employee
	 */

	private var op:AbstractOperation;
	public function loadEmployees():void {
		op = AppContext.getRemoteObject().getOperation("loadEmployees");	//获得Operation
		 op.arguments = [id];	//设定参数
		 var at:AsyncToken = op.send();	//Send
		 at.addResponder(this);	//为本实例增加responder

      }
Flex端responder剩余代码见:http://liguoliang.com/2009/02/777/
运行Flex工程, Flex取得RemoteObject, 然后通过channel建立到destination的连接,由Java读取数据库中信息, 并返回给Flex.
JDBC中Preparedstatement使用小结 及JDBC插入数据后获得Last insert ID
Categories: Java; Tagged with: Java • JDBC • MySQL • PreparedStatement; @ February 19th, 2009 10:20编写SQL语句, 尤其是要插入多个Filed时, 是一件非常BT的事情, 至少让我很不爽, 使用preparedstatement可以使代码变得更优雅一些, 虽然会有些长, 但会更条理, 而且preparedstatement更高于SQL语句 – 相对来说不太容易随着数据库版本改变而变动. 另外preparedstatement效率更高, 安全性更好
下面是恐怖的SQL:
			Statement statement = (Statement) conn.createStatement();
			String sql = "INSERT INTO `DEP`.`employee` " +
					"( `name` , `age` , `address` , `isMale` , `level` , `Department_ID` ) " +
					"VALUES (" +
					"'" + emp.getName() + "', " +
					emp.getAge()  + ", " +
					 JdbcUtilities.getSqlForString(emp.getAddress()) + ", " +
					emp.getIsMale() + ", "  +
					emp.getLevel() + ", " +
					emp.getDepartment_ID() + ");"
					;

			log.debug("Executing sql :" + sql);
			statement.executeUpdate(sql);

			ResultSet rs = statement.executeQuery("SELECT last_insert_id();");// .execute("SELECT last_insert_id();");
			if(rs.next()) {
				System.out.println(rs.getInt("1"));
			}
这里是使用PreparedStatement后的语句:
			String psql = "INSERT INTO Employee (name, age, address, isMale, level, Department_ID) VALUES (?, ?, ?, ?, ?, ?)";
			PreparedStatement ps  = conn.prepareStatement(psql,Statement.RETURN_GENERATED_KEYS);

			ps.setString(1, emp.getName());
			ps.setInt(2, emp.getAge());
			ps.setString(3, emp.getAddress());
			ps.setInt(4, emp.getIsMale());
			ps.setInt(5, emp.getLevel());
			ps.setInt(6, emp.getDepartment_ID());

			ps.executeUpdate();

			ResultSet keys = ps.getGeneratedKeys(); // equivalent to "SELECT last_insert_id();"

			if(keys.next()) {
				System.out.println(keys.getInt(1));
			}
PreparedStatement的使用步骤:
-
声明 PreparedStatement。
PreparedStatement prepStmt;
-
将一条 SQL 语句指派给 PreparedStatement 对象。
prepStmt = conn.prepareStatement(
   "INSERT INTO MyTable(MyColumn) values (?)");
-
为该语句指派输入参数值。
以下代码显示一个字符串参数。
String newValue;
// assign value
prepStmt.setStringParameter(1, newValue);
-
执行该语句。
返回值表示受该语句影响的行数。
long rowsInserted = prepStmt.executeStatement();
-
如果禁用了 [自动提交],请提交更改。
conn.commit();
获得组后插入的ID, 在上面代码中已经包括.
JDBC Transaction
Categories: Java; Tagged with: JDBC • Transaction; @ February 19th, 2009 10:12默认下JDBC是Auto-commit的. 但在必要情况下, 我们需要手动控制事务, 此时:
con.setAutoCommit(false); //关闭自动Commit
PreparedStatement updateSales = con.prepareStatement(
    "UPDATE COFFEES SET SALES = ? WHERE COF_NAME LIKE ?");
updateSales.setInt(1, 50);
updateSales.setString(2, "Colombian");
updateSales.executeUpdate();//执行Update Sales操作
PreparedStatement updateTotal = con.prepareStatement(
    "UPDATE COFFEES SET TOTAL = TOTAL + ? WHERE COF_NAME LIKE ?");
updateTotal.setInt(1, 50);
updateTotal.setString(2, "Colombian");
updateTotal.executeUpdate();//执行Update Total操作, 注意, 此二者必须同时执行成功 或同时失败.
con.commit(); //commit以上两个操作, 同时成功或失败
con.setAutoCommit(true); //将AutoCommit恢复为true
近日Java/Flex 编程小结,Log, Trace, toString, EventListener, weakreference, JDBC,ListCollectionView
Categories: Java; Tagged with: Flex • Java • JDBC • ListCollectionView • Log • toString • weakReference; @ February 19th, 2009 9:571. Flex中的Trace, Java/Flex中的log, 并不能代表其真实行为.
2. 务必牢记重写toString方法
3. Flex: 在跨越幅度较大, 设计Obj较多时, 使用weakreference的 Event Listener
4. 关于weakreference, 相对普通reference来说, weakreference像一个棉线, 牵着Obj – 但不妨碍garage Collection, 而普通reference则像铁链一样牢牢绑着obj, 会阻止进行garage Collection. 如果一个Object只有weak reference指向他, 则基本可以视为已经被garage Collection,
5. 可以在每个Class中加入一个Object_ID Filed, 在构造函数中使用randomNumber填充 – 便于分辨对象
6. JDBC 的 traction不是线程安全的
7. 谨慎使用ArrayCollection, Array的sort, filter功能 – 因为这会打乱其自身. 在使用其作为DataProvider时, 应使用ListCollectionView, 这样在进行操作时则其本身不会有任何改变
Java/ActionScript – String.split(), 及For in 小结
Categories: Java; Tagged with: ActionScript • Java • split() • String; @ February 15th, 2009 11:36Java 5.0中:
public String[] split(String regex)
根据给定正则表达式的匹配拆分此字符串。
该方法的作用就像是使用给定的表达式和限制参数 0 来调用两参数 split 方法。因此,所得数组中不包括结尾空字符串。
例如,字符串 "boo:and:foo" 使用这些表达式可生成以下结果:
Regex 结果
: { "boo", "and", "foo" }
o { "b", "", ":and:f" }
参数:
regex – 定界正则表达式
返回:
字符串数组,它是根据给定正则表达式的匹配拆分此字符串确定的
抛出:
PatternSyntaxException – 如果正则表达式的语法无效
从以下版本开始:
1.4
注意: 使用转义字符.
如:
		String str = "192.168.1.1";
		String[] strs = str.split("\\.");
		for (String string : strs) {
			System.out.println(string);
		}
输出:
192
168
1
1
ActionScript中:
			var str:String = "192.168.1.1";
			var strsArray = str.split("\.");//str.split(".");
			for each(var s:String in strsArray) {
				trace(s);
			}
			for(var s:String in strsArray) {
				trace("for in " + strsArray);
			}
输出信息:
for-each-in 192
for-each-in 168
for-each-in 1
for-each-in 1
for in 0
for in 1
for in 2
for in 3
另外, 在AS中, for in 和for each in 的区别:
for-each-in 类似于Java5.0之后的for-in, 如上所使用
在AS中for-in的循环迭代于变量名中, 如上AS代码中的for-in输出的是Array的index[下标], 如果要打印value, 则应使用 在trace中使用strsArray[s].
