使用ANT生成SWC Building SWC with ANT
Categories: Flex; Tagged with: ANT • Flex • SWC; @ November 3rd, 2008 14:44by Tomasz Stocki on October 19, 2008 Avg 原载: Flex cookbook beta 翻译及整理:LiGL
问题摘要 Problem Summary
你试图使用ANT编译SWC文件. You want to compile your swc using ant.
解决方法 Solution Summary
使用Adobe在Flex SDK中提供的Flex ANT任务来编译你的应用 Use flex ant tasks provided by adobe in flex SDK to compile your application.
解释 Explanation
在部署应用程序时, 我们可以使用ANT这个强大的工具—它可以帮助我们运行程序, 运行命令行, 复制文件,等等…
When deploying flex application we can use very powerful tool – ant. With his help we can launch applications, run command line tools, copy files and much, much more (see: http://ant.apache.org/manual/index.html)
在开始之前, 如果你使用的时FlexBuilder单独版本[非Eclipse插件版], 你需要先安装ANT
Before we start you should install ANT on your flex builder if you have stand alone version.
参考: See article “Installing Ant in Flex Builder 3” at :
http://blog.jodybrewster.net/2008/04/09/installing-ant-in-flex-builder-3/
安装完毕之后, 只需要建立以下两个文件: After that, just create two files in project:
build.properties: —–该文件用于存储Bulid.xml中用到的属性, 便于管理与查看
###### Flex Properties ##############################

# change this path to your flex sdk directory

# Use "/" in your directory path e.g. C:/FlexSDK/3.0.0

FLEX_HOME=C:/flex_sdk_4.0

###### Project Properties ###########################

src-dir=${basedir}/src
build.xml:
<project name="Ant build SWC sample" basedir="." default="build SWC">

<!-- load user configuration properties -->

<property file="build.properties" />

<taskdef resource="flexTasks.tasks" classpath="${FLEX_HOME}/ant/lib/flexTasks.jar" />

<!-- =================================

target: build SWC

================================= -->

<target name="build SWC">

<compc output="${basedir}/swc/sample.swc"

include-classes="tom.hallo.CHalloWorld">

<source-path path-element="${src-dir}" />

</compc>

</target>

</project>
第一个文件中存储了关于本机FlexSDK及工程的目录. First file build.properties, holds info about location FlexSDK and files structure in your project.
在Build.xml中的代码读取第一个文件并运行ANT的compc任务生成swc文件. Code in build.xml loads build.properties and run ant task compc to generate swc.
在FlexBuilder中, 只需要将Build.xml从导航栏中拖到Ant视图中, 然后双击’build SWC’任务. In Flex Builder, just drag and drop build.xml from Flex Navigator to Ant view and double “click build SWC” task.
Flex中使用国际化语言 Use I18N In Flex
Categories: Flex; Tagged with: Flex • Flex国际化 • I18N • Locale; @ November 2nd, 2008 15:441.目的: 在Flex中工程使用多种语言, 如英语, 简体中文, 繁体中文等国际化语言, 以供不同地区或不同语言的用户使用
关于I18N的介绍,详见http://en.wikipedia.org/wiki/I18n
2. 具体实现:
2.1 建立相关语言文件:
语言文件存储于相关.properties文件中. 与Java中类似, Properties文件的每行都以key=value的形式书写. 使用!或#开始一行的注释.
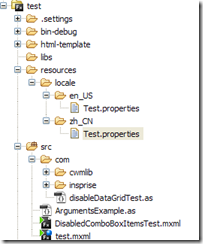
首先我们建立一个名为resources的目录[名字随便叫, 关键要代表他里面的东西] , 然后建立一个子目录locale, 在该目录下放置各个语言文件. 如下图:

en_US下Test.Properties的内容:
test.info = Current Langunage: English {0} //{0}的意义在后面会有介绍.
zh_CN下的内容:
test.info = 当前语言: 中文 {0}
Properties文件编辑Eclipse插件安装地址: http://liguoliang.com/2010/04/1232/
2.2 将语言包添加到flex工程build Path中.
将刚才建立的目录resources/locale/{locale} 加入到Build Path中. {locale}代之在有上下文时具体的语言包. 如上图中所示之en_US与zh_CN;
同时,要在该工程的编译参数中, 加入要使用的语言, 如 -locale en_US zh_CN;
2.3 使用语言包中内容:
1. MXML中, 直接使用:
text=”@Resource(key=’test.info’, bundle=’Test’)”; 或:
text=”{resourceManager.getString(‘Test’,’test.info’, [‘liguoliang.com])}” // 可随语言改变自动更新
getString的第三个参数,格式为数组, 在之前的语言包中,我们使用了{0}, 意思就是使用该参//数[数组]的第一个元素填充.
2. AS中, 但随着语言改变不能自动更新.
[ResourceBundle("liguoliang")]
public class AssessItemSelector extends EventDispatcher
{
	protected static const RM:IResourceManager = ResourceManager.getInstance();
	protected static const BUNDLE_LGL:String = "Test";

var title:String = RM.getString(BUNDLE_LGL, "test.info");

}
以上两方法都会打印Test.properties文件中 test.info的内容.
2.4 动态改变语言:
改变语言:
import com.insprise.common.LocaleUtils;
import mx.resources.ResourceManager;
import mx.resources.ResourceBundle;

private function setLangToEn_US():void {
	//使用ResourceManager.getInstance().localeChain 设置语言 .
	ResourceManager.getInstance().localeChain = ['en_US'];
}
private function setLangToZh_CN():void {
	//使用ResourceManager.getInstance().localeChain 设置语言 .
	ResourceManager.getInstance().localeChain = ['zh_CN'];

}
使用两个按钮分别呼叫上面两个函数, 进行语言的改变.
3. 抓图:
[千斤顶之一日一类002]Top Level: Array学习
Categories: Flex; Tagged with: ActionScript • Array • Flex; @ November 1st, 2008 23:28坦白说每天搞一个类是很累且疲惫的, 今天是玩千斤顶的第二天, 周六, 我突然体味到那些包二奶的爷们们的难处, 多累啊….试想我每天看一个类, 今天是第二把尝试, 都有些扛不住了, 下午逛街回来给娘做了饭, 一起吃完看了会儿电视, 着实扛不住了, 就小憩了半个小时才爬起来看今天的One Day One Class. 假如给我400个女人, 让我One Day One Woman, 我岂不是要累死?
不扯了, 总结下Array类.
Top Level: Array
. 游标[index]从0开始;
. Array()可以以函数方式被调用
. 可以往Array里存储数字, 字符串, 对象, Array.
. Array是稀疏的, 如果某数组在index为0与5时都包含对象, 但是在0与5之间没有任何值, 则如果调用中间元素时,返回"undefined";
. 传地址, 而非传值. 即: 如果将某数组赋值给另外一个数组, 则该来那个歌数组都指向同一个数组, 修改其中一个, 另外一个也随之修改. 不同于数字与字符串等
. 不要用数组来建立哈希表
. 可以继承Array类, 并 重写,增加方法, 但必须制定该子类为Dynamic类型, 否则将无法使用Sort.
Public Properties
length : uint 返回数组的长度
继承来的我就不说了…..
Public Methods
归归类, 不然就太没有创意了,跟API一模一样….
1. 数组的创建:
var arrayStu_1:Array = new Array(1); //创建一个长度为1的数组. 但如果不赋值, 都是undefined
var arrayStu_2:Array = new Array("arrayStu_2_Index0", "arrayStu_2_Index1"); //创建包含有括号里这俩元素的数组
var arrayStu_3:Array = ["arrayStu_3_Index0", "arrayStu3_Index1"]; //这个更直接一些了, 直接赋值.
2. 数组元素的访问, 增加, 修改, 删除:
访问: array[i], 访问某元素, 如果要访问全部, 使用For循环
增加:
Push(): 将一个或多个元素添加到数组的结尾,并返回该数组的新长度。
unshift(): 将一个或多个元素添加到数组的开头,并返回该数组的新长度。
修改: 直接赋值: array[i] = new value;
删除:
Pop(): 删除数组中最后一个元素,并返回该元素的值。
Shift(): 删除数组中第一个元素,并返回该元素。 其余数组元素将从其原始位置 i 移至 i-1。同时该数长度减少一位;
另外:
splice():给数组添加元素以及从数组中删除元素 可以用于增加或删除元素,同时增大或减小数组长度;
3. 长度或index操作:
length:返回array的长度;
indexOf(): 从左向右遍历数组, 遇到符合要求的元素时, 返回该元素index. 如果遍历结束仍未发现符合要求的元素,返回-1;
lastIndexOf(): 与inidexOf()相反, 从右向左寻找要求的元素;
4. 数组的操作
数组的连接: concat(), 数组的连接 如:
arrayStu_2 = arrayStu_2.concat(arrayStu_1);
trace(arrayStu_2.toString()); //显示: arrayStu_2_Index0,arrayStu_2_Index1,——注意这个逗号, 意为后头还有个空的. 因为arrayStu_1只是一个长度为1但没有元素的数组.
数组元素的检测: evey(): 对数组中的每一项执行测试函数,直到获得对指定的函数返回 false 的项。 使用此方法可确定数组中的所有项是否满足某一条件,如具有的值小于某一特定数值。
筛选出符合要求之元素并新建一个数组: filter();
Join():将数组中的元素转换为字符串、在元素间插入指定的分隔符、连接这些元素然后返回结果字符串。
Map(): 返回一个新数组,其中包含此函数对原始数组中每一项的执行结果。
reverse(): 在当前位置倒转数组。
slice(): 返回由原始数组中某一范围的元素构成的新数组,而不修改原始数组。 返回的数组包括 startIndex 元素以及从其开始到 endIndex 元素(但不包括该元素)的所有元素。 如果您没有传递任何参数,则创建原始数组的一个副本。如果两参数均为-1, 则起点或终点为数组的结尾, -1 指的是最后一个元素。
5. 其他操作
Some(), Sort(), SortOn()
[千斤顶之一日一类001]Top Level: Arguments类学习
Categories: Flex; Tagged with: ActionScript • Flex; @ November 1st, 2008 0:20Package Top Level
Class public class arguments
Inheritance arguments Inheritance Object
简要介绍[主要是翻译API, 寒]:
一个Arguments类主要用来存储与访问一个函数的参数, 在函数体内, 可以通过本地参数变量来访问Arguments对象.
Arguments对象存储形式为数组, 因此,arguments[i]即代表了第i个参数(前提时有这么多参数….)
相对与之前的ActionScript版本,ActionScript3.0中不再使用Arguments.caller[之前的版本没用过:(], 在3.0中, 如果需要访问调用该参数的函数, 则可以使用arguments.callee.
Public Properties[不知道该咋翻译, 继续寒]:
callee:Function 返回调用该参数的当前函数
length: Number 参数数目[ 即参数作为数组的长度]
举例: [小修改了下API里的例子]
在初始化时运行 ArgumentsExample(1,’ss’);
    import flash.display.Sprite;
        private var count:int = 1;

        public function ArgumentsExample(i:int, s:String):void {
        	//参数以数组形式存放于arguments中.
        	trace("第一个参数: " + arguments[0] + " 第二个参数: " + arguments[1] + " 共有 " + arguments.length + "个参数.");
        	trace(arguments.callee == this.ArgumentsExample);
            firstFunction(true);
        }

        public function firstFunction(callSecond:Boolean):void {
            trace(count + ": firstFunction");
            if(callSecond) {
            	//调用secondFunction, 参数为firstFunction
                trace(arguments.callee);
            }
            else {
                trace("CALLS STOPPED");
            }
        }

        public function secondFunction(caller:Function):void {
            trace(count + ": secondFunction");
            count++;
            //此时caller即firstFunction, 实际运行为firstFunction(false);
            caller(false);
        }
运行结果:
第一个参数: 1 第二个参数: ss 共有 2个参数.
true
1: firstFunction
1: secondFunction
2: firstFunction
CALLS STOPPED
FlexUnit使用 Useing FlexUnit
Categories: Flex; Tagged with: Flex • FlexUnit; @ October 31st, 2008 0:071.下载FlexUnit
[地址:http://opensource.adobe.com/wiki/display/flexunit/Downloads] 并在应用中加入库文件:
目前版本为0.9, 下载完解压缩之后, 在Flex或AIR工程的Flex Build Path的Library Path中加入FlexUnit.swc库文件.
2. 创建测试用例
待测试的单元:
package
{
public class SimpleConverter
{
	public function SimpleConverter() {
	}

	public function convertToString(i:int):String {
		var s:String = "错误!"
		if(i == 1) {
			s = "是";
		}else {
			s = "否";
		}
		return s;
	}

}
}
测试用例:
package
{
import flexunit.framework.Assert;
import flexunit.framework.TestCase;

public class TestSimpleConverter extends TestCase
{
	public function TestSimpleConverter(methodName:String=null) {
		super(methodName);
	}

	/**
	 * 测试用例
	 */
	 public function testSimpleConverter():void {
	 	var sc:SimpleConverter = new SimpleConverter();
	 	var s:String = sc.convertToString(1);
	 	Assert.assertEquals(sc.convertToString(1), "是");
	 }
}
}
3.在应用中加入测试用例:
		import flexunit.framework.TestSuite;
		private  function onCreateComplete():void {
			var ts:TestSuite = new TestSuite();
			ts.addTest(new TestSimpleConverter("testSimpleConverter"));
			testRunner.test = ts;
			testRunner.startTest();
		}


